
“Need a little heat” ~ Well the real answer to that questions is “maybe”. In the vast majority of cases, chickens do not need a supplemental heat source. If in doubt, think of the small sparrows and other winter birds that visit your feeders in the middle of winter…
Furnishing your flock with a well-ventilated, draft-free coop and adding insulating material will help keep them comfortable all winter long. A little scratch about 30 minutes before bedtime will help as well. It’s also important that you select the correct breed of birds for your environment, but hopefully you have done that prior to winter arriving…
There may be times that you do want to add a little heat. Typically this is when you have a sick or injured bird, young birds, or birds that for one reason or another have lost their feathers.
When you make the decision to add heat its important that you don’t overdue it. This is a perfect example that if a little of something is good, too much of it is deadly! Here at The Chicken Fountain™ when I make the decision to add heat it is not taken lightly. Adding heat is dangerous no matter how you do it! Just think about how dust, dander, small flammable creatures running around, wooden structures, heat, and electricity can add up to a disaster. Be careful and think this through…
When I add heat I do it with a radiant heat source. You can purchase some really nice (and expensive) units, or you can easily make one yourself. While I do have one of the commercial units when I have a lot of chicks brooding, I mostly use my homemade version which preforms just as well for a fraction of the cost. I call it our Flower Pot Heater and the directions are below.
FLOWER POT HEATER
- Items needed:
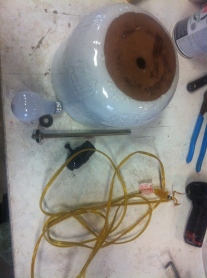
- One 10″ to 12″ inch flower pot with a center hole in the bottom
- You can use a terracotta pot or a clay pot but don’t use a plastic or compression pot.
- Lamp fixture with cord.
- I purchased an old lamp at the second hand store for $2.00 and just disassembled it, all my parts were there.
- You will need the bulb fixture, extension tube, assorted washers, retention nut and a cord with plug.
- I purchased an old lamp at the second hand store for $2.00 and just disassembled it, all my parts were there.
- One 12″x 12″ concrete paving stone.
- One 60 watt light bulb.
- One 10″ to 12″ inch flower pot with a center hole in the bottom
Step 1 ~ Make sure the flowerpot is cleaned out and completely dry.
Step 2 ~ Disassemble the lamp and retain all of the parts.
Step 3 ~ Slip off the cover of the bulb fixture and loosening the screws remove the cord form the fixture.
Step 4 ~ Attach the bulb fixture to the flowerpot by using the nut and washers from the lamp. You will need a extension tube (available at Lowe’s $1.00) but many lamps already have one you can reuse.
Step 5 ~ Slide the cord through the extension tube and hole in the bottom of the flowerpot. Reattach to the bulb fixture.
Step 6~ Place a dab of silicone on the opening where the lamp cord enters the extension tube. This will seal out any dust or dander from getting into the fixture.
Step 7 ~ Ensure you replace the cover on the bulb fixture.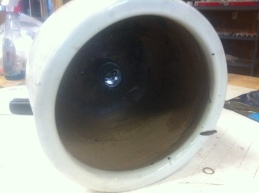
Step 8 ~ Install a 60 watt incandescent light bulb. Please note: Don’t use a LED light bulb as these do not produce the heat needed.
Step 9 ~ Flip the unit over onto a clean 12″x 12″ concrete or brick paver roughly 1″ to 2″ thick and turn the light on. Make sure that the concrete paver completely covers the opening of the flower pot. Allow to warm up.
Step 10 ~ Place the unit inside the coop ensuring that you route the cord in a manner that the birds can not become entangled in it.
My flock loves this type of heater because they can deiced for themselves if they need any supplemental heat. If they do they sit closer to it if not they leave it alone. This set up works great with young birds who may not be completely feathered out as well as birds who may have suffered feather loss or are ill. A healthy mature flock does not need any supplemental heat.
This low cost Flower Pot Heater produces just enough heat to allow your birds to snuggle up next to it and not run the risk of getting burned. The clay material will warm from the inside out and radiate the heat to the surrounding area. It is not designed to heat a coop which is never recommended but it does produce enough heat to help keep their bodies warm.
A note of caution… Anytime you add electricity to a coop there is risk involved! Always make sure that you use quality materials. Frayed or split lamp cords loose electrical fixtures poor quality extension cords and open plugs can all pose a potential fire hazard. If in doubt get professional advise.
Frank@TheChickenFountain™

What is the best place to put this? I have a space c 6×9. Should it be close to nesting boxes? Roost? Or out in the middle? Love the idea and will be hitting flea market tomrrow!
I try to keep all distractions away from the nesting boxes. If space is an issue I’d put it closer to the roost then the boxes…